> ## Documentation Index
> Fetch the complete documentation index at: https://docs.topify.ai/llms.txt
> Use this file to discover all available pages before exploring further.
# Tutorial: Generate articles
> Generate, review, edit, and publish AI-optimized articles.
Generate an AI-optimized article, review the output, edit the metadata, and publish it. By the end you'll have a draft article ready to ship to your CMS.
**Prerequisites**: A project with bootstrapping complete, plus available generation credits on your plan. See [Billing and plans](/platform/billing-and-plans) for credit limits.
Blog and owned-site content is the foundation of GEO — it's the only AI-era brand asset you fully control. Expect **30–60 days** for new articles to translate into a noticeable lift in organic traffic. See [GEO methodology](/concepts/geo-methodology#channel-mix-for-geo) for the full channel-mix breakdown.
## Where article generation lives
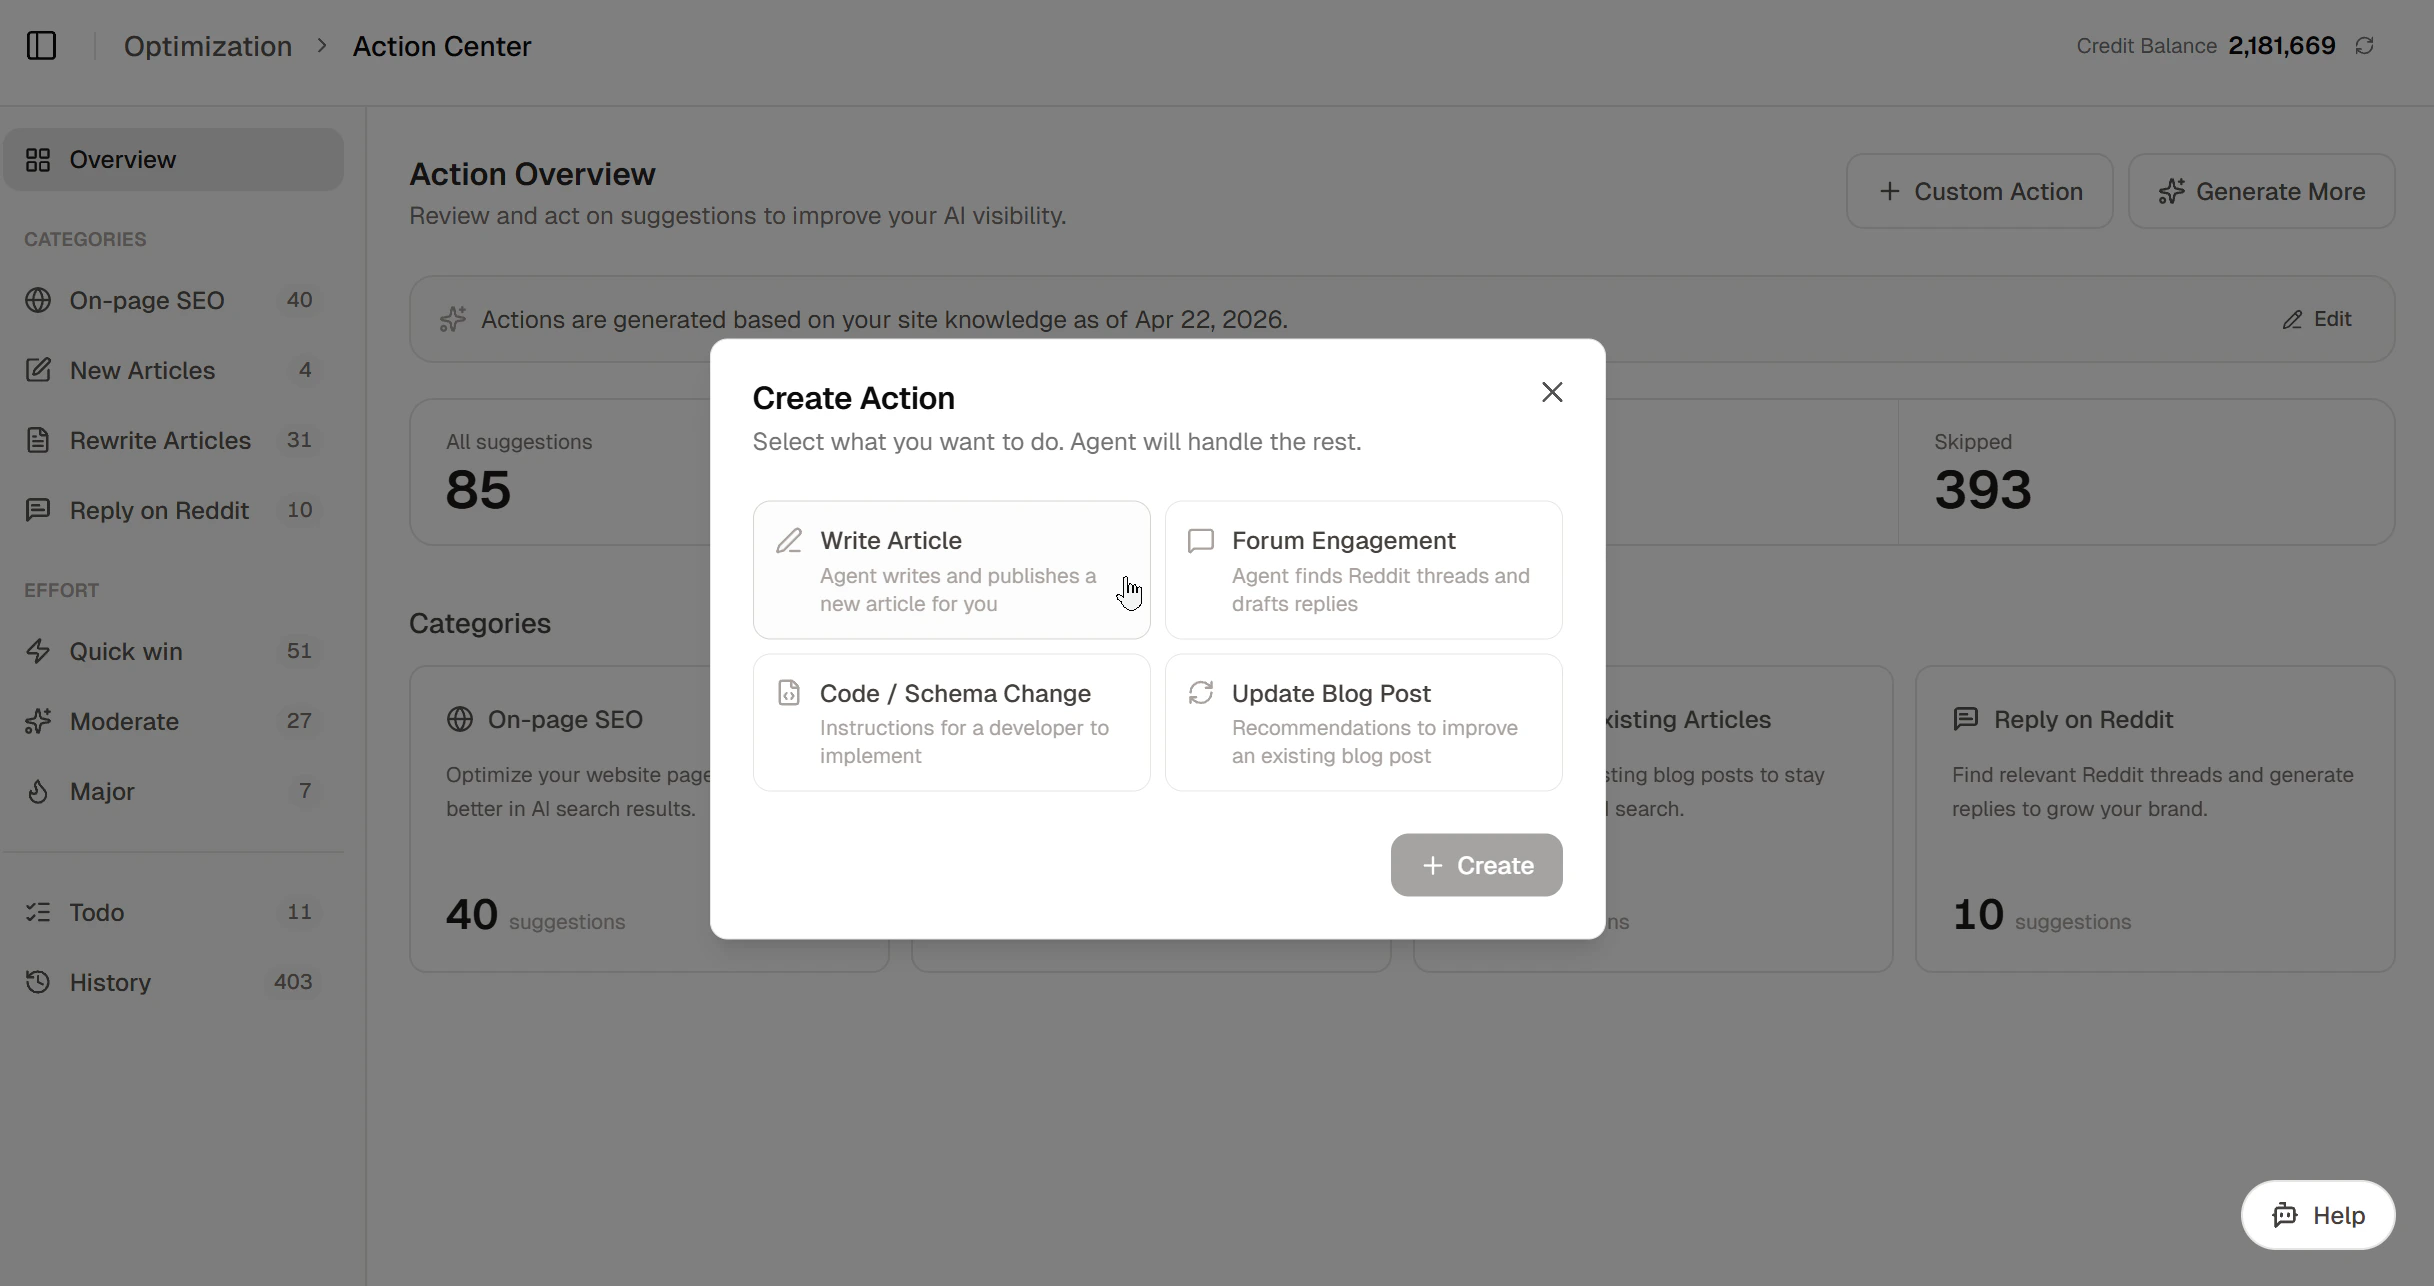
Open **Optimization > Actions**. This is your home for article work — Topify recommends article tasks based on your project's data, and you can also create your own from scratch.
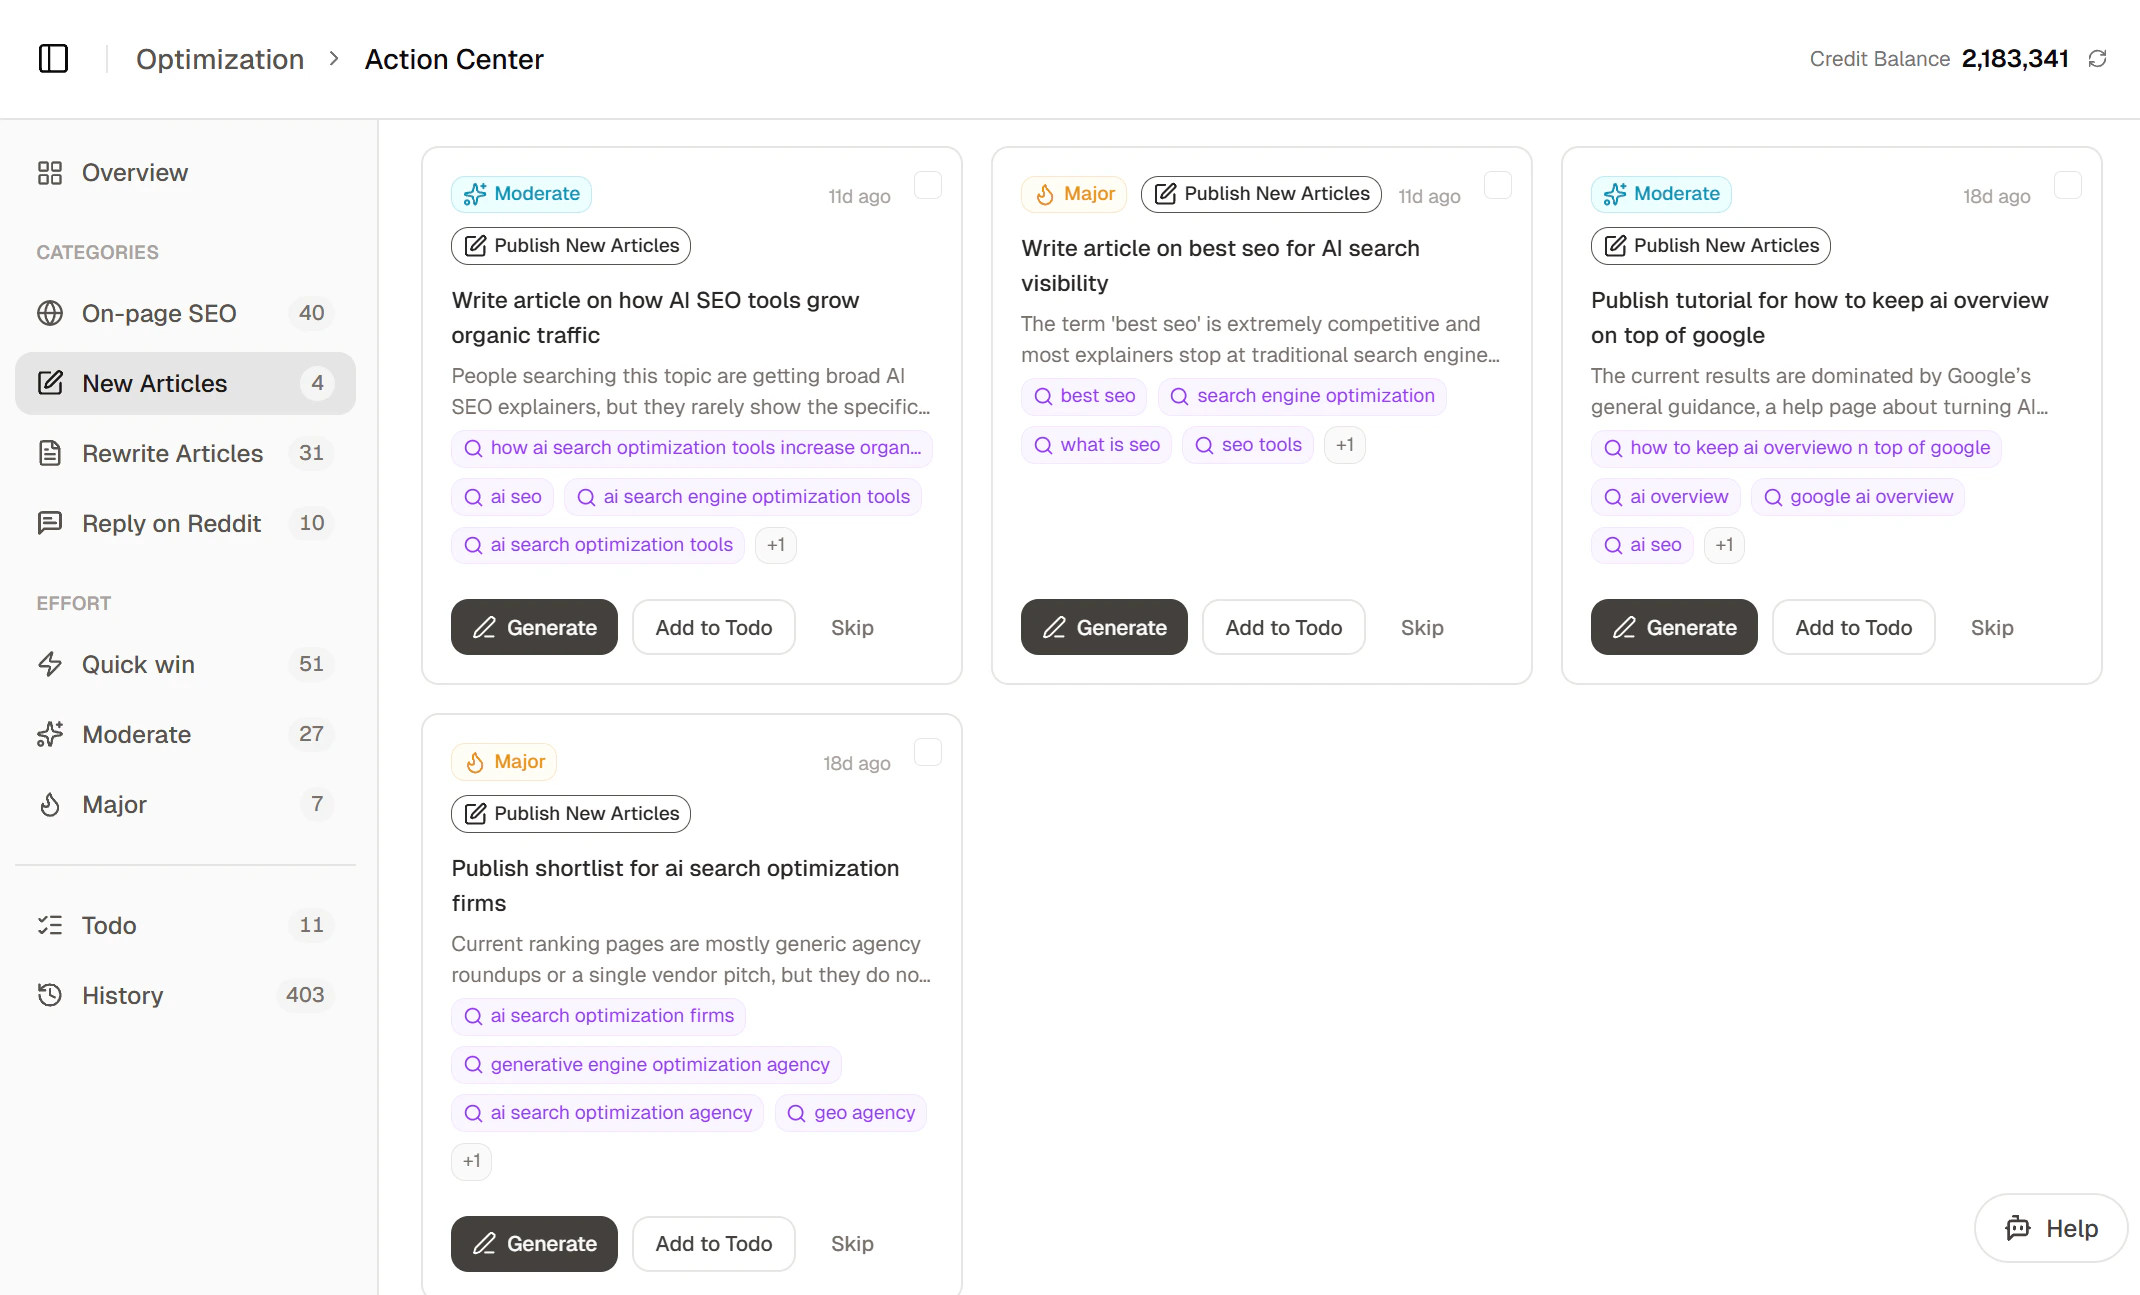 To start an article, click into one of the recommended actions to follow the steps below — or jump to [Create your own](#create-your-own) at the end of the page if you'd rather start from scratch.
Unsure about an input? Click **Let AI decide** anywhere it appears and Topify will fill it in for you. You can override later.
## Steps
Before you click **Generate**, take a moment on the input config — the angle, references, and outline strategy you set here drive everything downstream:
* **Pin a unique angle** -- generic prompts produce generic content. Specify the angle, audience, and tone.
* **Cite real references** -- reference URLs get extracted into the writer's context, so the article quotes them with citations AI engines can verify.
* **Try a short outline-only first draft** -- if the topic is broad, generate a short outline-only article first and use it to refine your prompt for a longer follow-up.
Click **Generate**. Topify queues the article and runs the multi-step pipeline in the background:
1. **Web research** -- finds grounding truth, data points, and supporting evidence for your topic. Takes around 2--3 minutes.
2. Reference extraction
3. File processing
4. Outline generation
5. Drafting (SEO metadata is produced here)
6. GEO optimization (citations, statistics, authoritative tone applied to the draft)
7. Image generation
8. HTML conversion
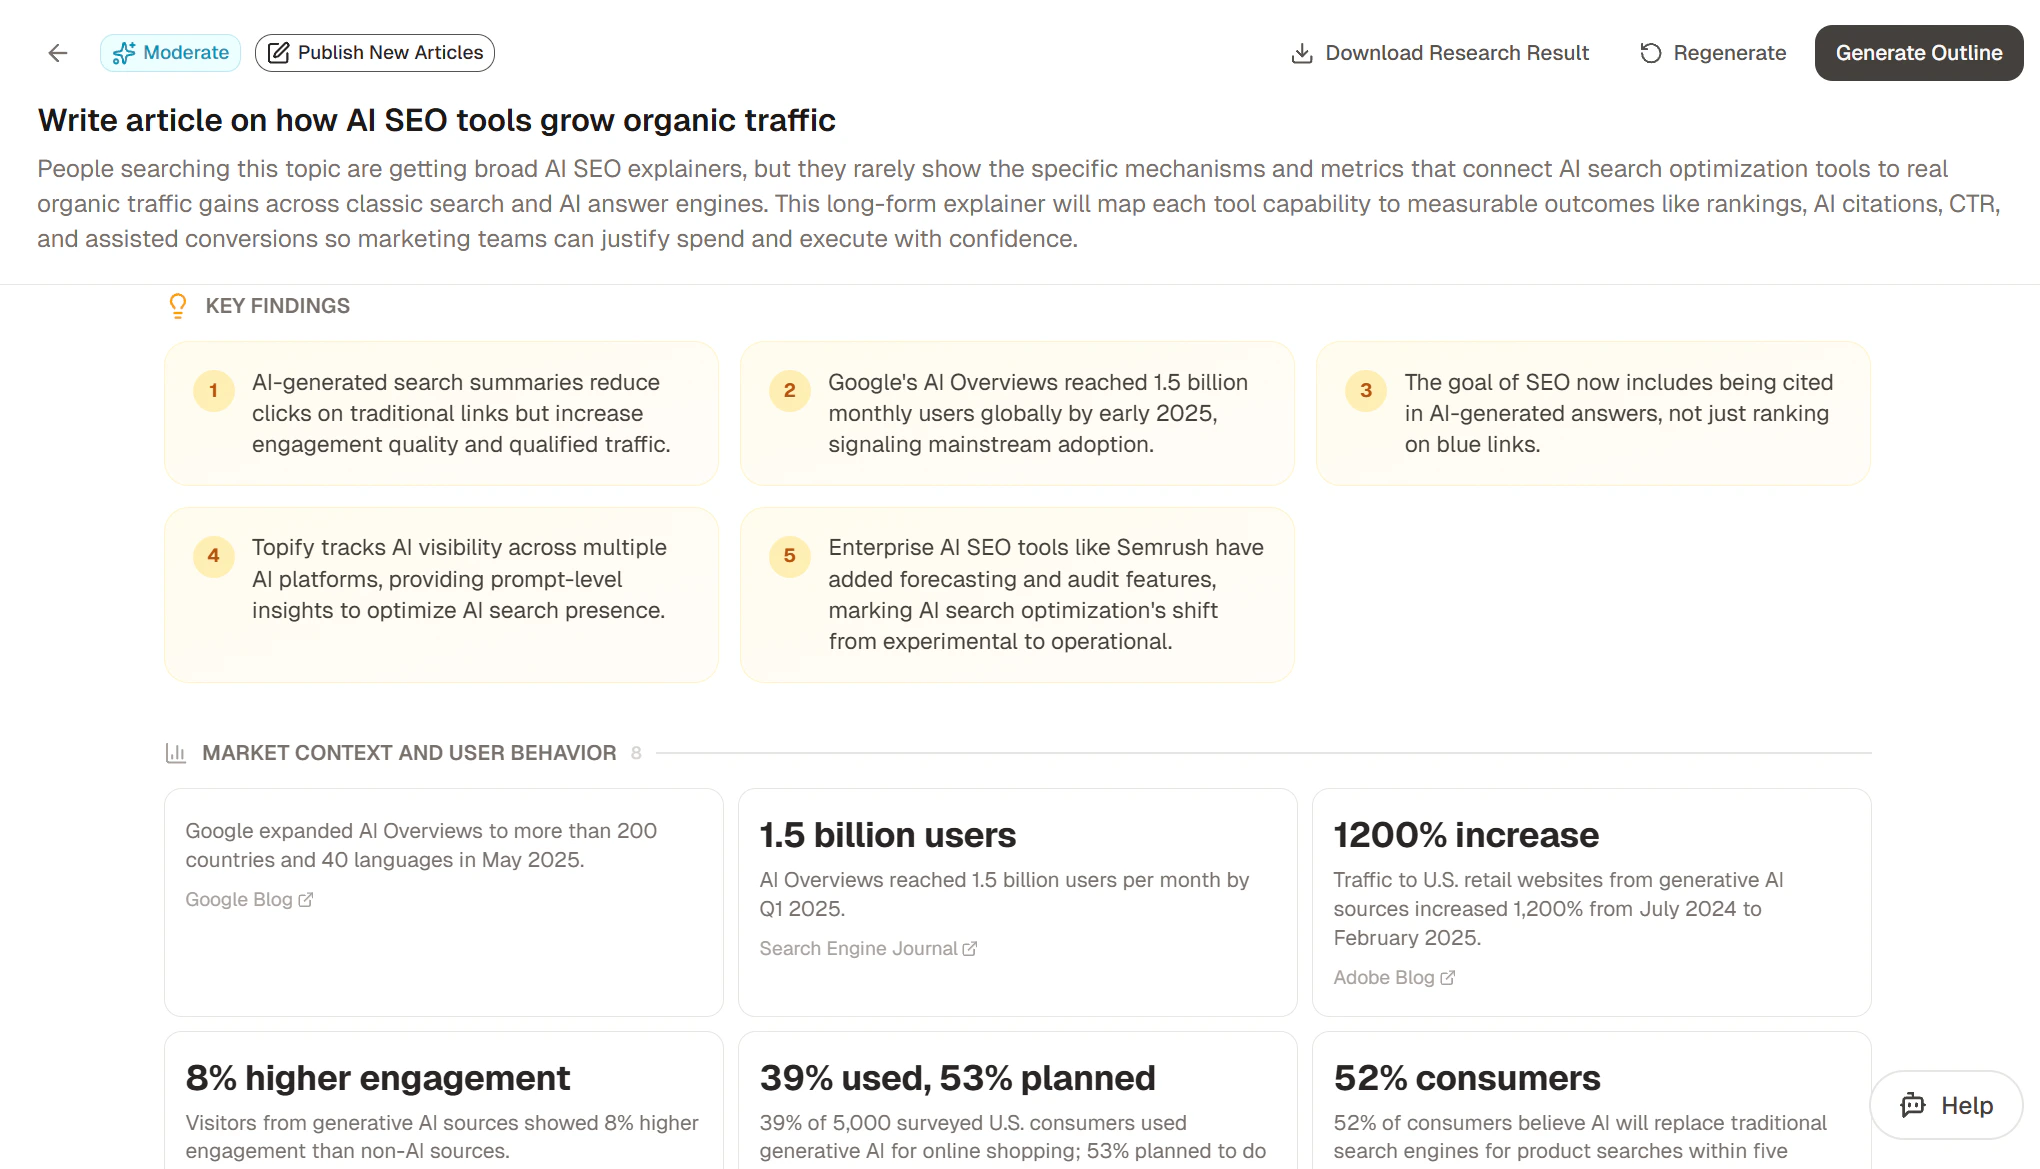
Topify researches your topic from multiple sources before a single word of the draft is written:
* **Live web search** -- pulls current statistics, news, and authoritative coverage from across the web, plus the top-ranking pages for each of your keywords so the article matches what already performs in search.
* **Your reference URLs** -- every link you provided is fetched and its content is extracted into the writer's context.
* **Your uploaded files** -- PDFs, Word docs, spreadsheets, and text files you attached are read and summarized so internal data and proprietary insights are incorporated.
* **Your brand context** -- your project's industry, competitors, and positioning are loaded so the article stays on-brand.
* **Real community discussions** (forum-style articles only) -- relevant Reddit threads are fetched so the article reflects how people actually talk about the topic.
The research step also enforces quality safeguards:
* **Recency** -- data from the last 12 months is prioritized; outdated stats are downranked.
* **Concrete data only** -- numbers, dates, and specs must be precise. Vague claims are filtered out before they reach the draft.
* **Competitor parity** -- for comparison articles, every competitor you specify is researched at equal depth.
* **Fact-check pass** -- once the draft is written, the system re-reads it against the research dossier and flags unsupported claims.
When research completes, you can review the dossier — key findings and sourced data points — before the article is drafted. Click **Download Research Result** to export it, **Regenerate** to re-run research, or **Generate Outline** to continue.
To start an article, click into one of the recommended actions to follow the steps below — or jump to [Create your own](#create-your-own) at the end of the page if you'd rather start from scratch.
Unsure about an input? Click **Let AI decide** anywhere it appears and Topify will fill it in for you. You can override later.
## Steps
Before you click **Generate**, take a moment on the input config — the angle, references, and outline strategy you set here drive everything downstream:
* **Pin a unique angle** -- generic prompts produce generic content. Specify the angle, audience, and tone.
* **Cite real references** -- reference URLs get extracted into the writer's context, so the article quotes them with citations AI engines can verify.
* **Try a short outline-only first draft** -- if the topic is broad, generate a short outline-only article first and use it to refine your prompt for a longer follow-up.
Click **Generate**. Topify queues the article and runs the multi-step pipeline in the background:
1. **Web research** -- finds grounding truth, data points, and supporting evidence for your topic. Takes around 2--3 minutes.
2. Reference extraction
3. File processing
4. Outline generation
5. Drafting (SEO metadata is produced here)
6. GEO optimization (citations, statistics, authoritative tone applied to the draft)
7. Image generation
8. HTML conversion
Topify researches your topic from multiple sources before a single word of the draft is written:
* **Live web search** -- pulls current statistics, news, and authoritative coverage from across the web, plus the top-ranking pages for each of your keywords so the article matches what already performs in search.
* **Your reference URLs** -- every link you provided is fetched and its content is extracted into the writer's context.
* **Your uploaded files** -- PDFs, Word docs, spreadsheets, and text files you attached are read and summarized so internal data and proprietary insights are incorporated.
* **Your brand context** -- your project's industry, competitors, and positioning are loaded so the article stays on-brand.
* **Real community discussions** (forum-style articles only) -- relevant Reddit threads are fetched so the article reflects how people actually talk about the topic.
The research step also enforces quality safeguards:
* **Recency** -- data from the last 12 months is prioritized; outdated stats are downranked.
* **Concrete data only** -- numbers, dates, and specs must be precise. Vague claims are filtered out before they reach the draft.
* **Competitor parity** -- for comparison articles, every competitor you specify is researched at equal depth.
* **Fact-check pass** -- once the draft is written, the system re-reads it against the research dossier and flags unsupported claims.
When research completes, you can review the dossier — key findings and sourced data points — before the article is drafted. Click **Download Research Result** to export it, **Regenerate** to re-run research, or **Generate Outline** to continue.
 Generation typically takes 2--5 minutes. You can leave the page; the status updates live when you return.
From the research result page, click **Generate Outline** to draft a structured outline. The outline shows H2 sections, H3 subsections, and the data points pulled from research that each section will draw from.
Generation typically takes 2--5 minutes. You can leave the page; the status updates live when you return.
From the research result page, click **Generate Outline** to draft a structured outline. The outline shows H2 sections, H3 subsections, and the data points pulled from research that each section will draw from.
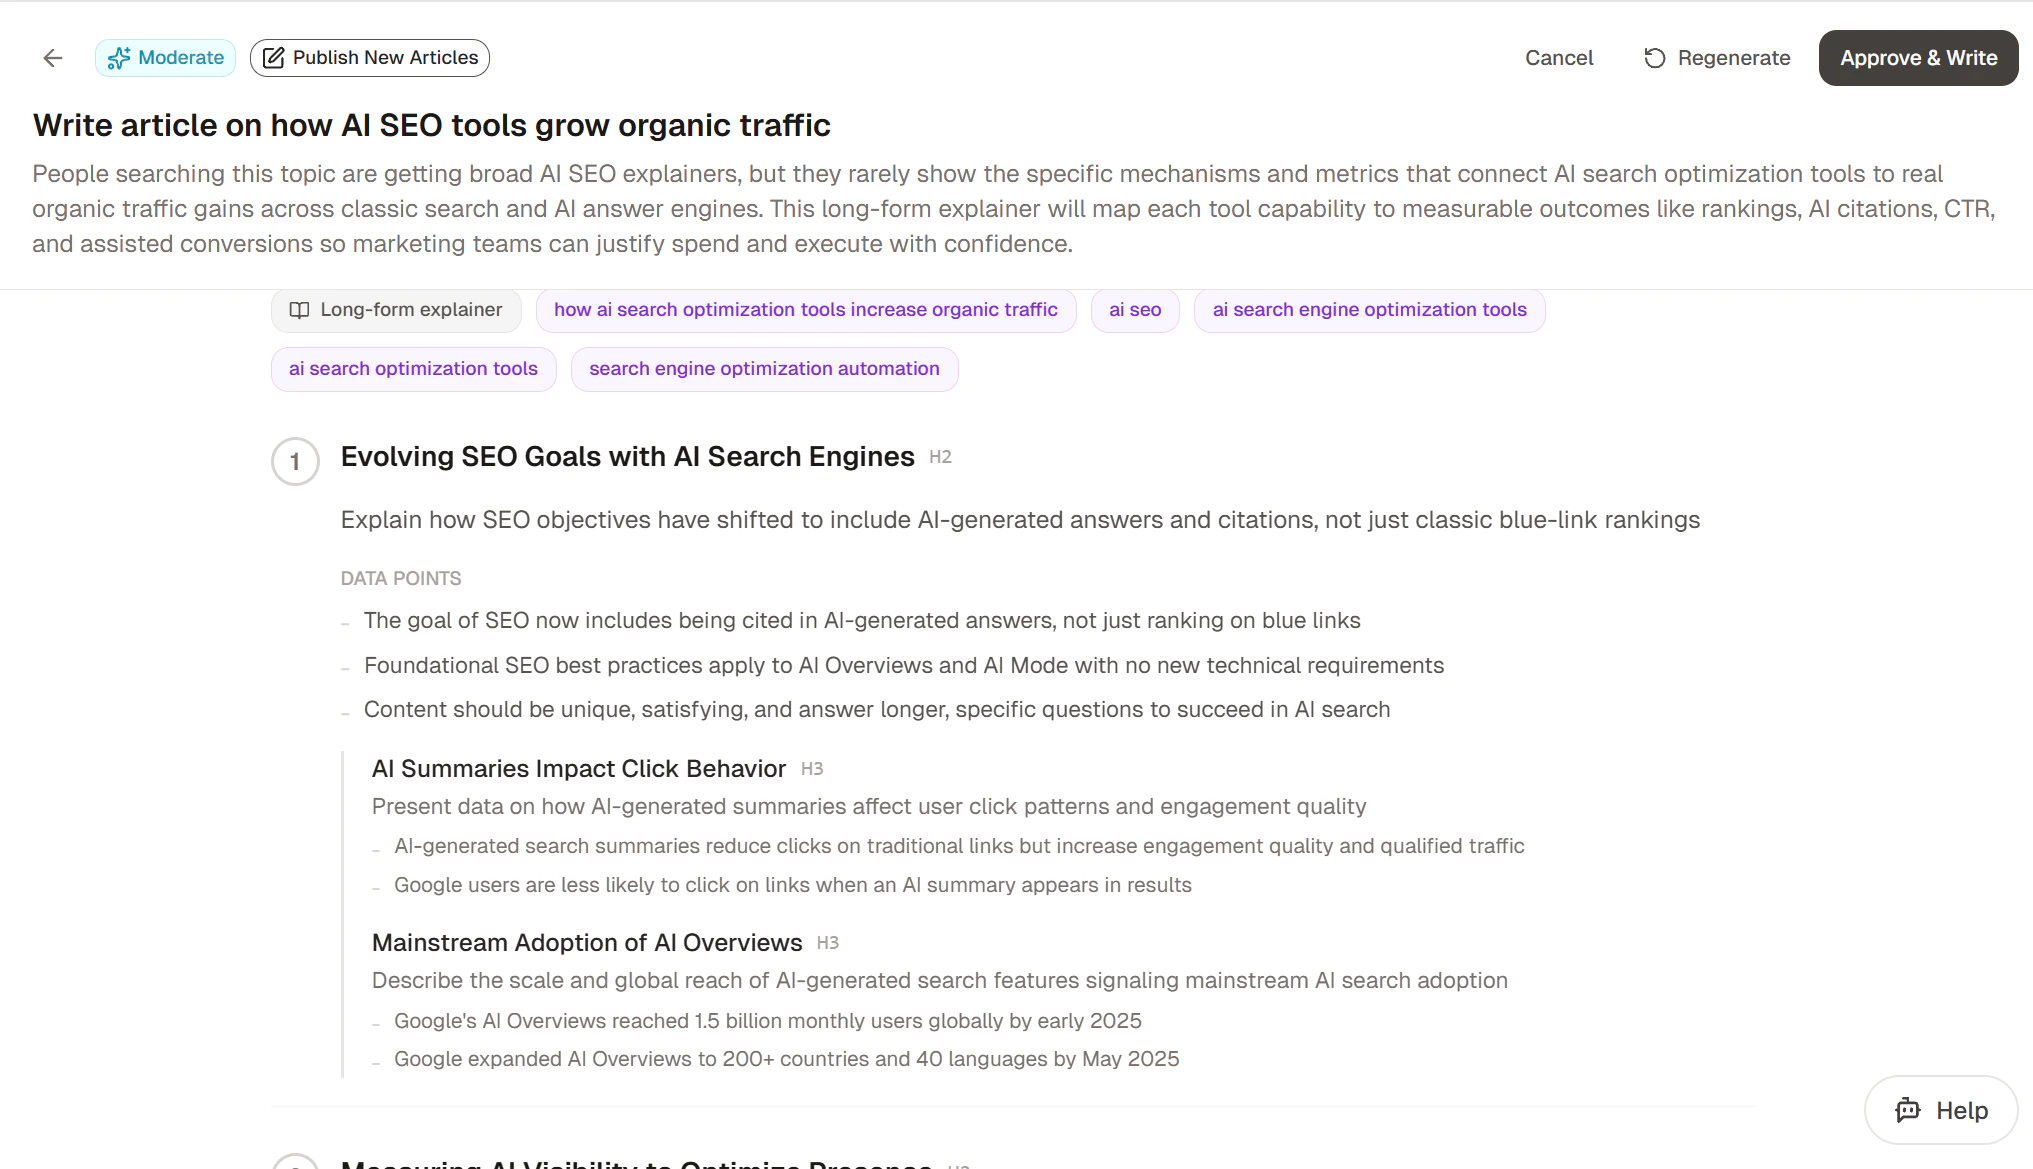 Use **Regenerate** to redraft the outline, **Cancel** to go back, or **Approve & Write** to commit and start drafting.
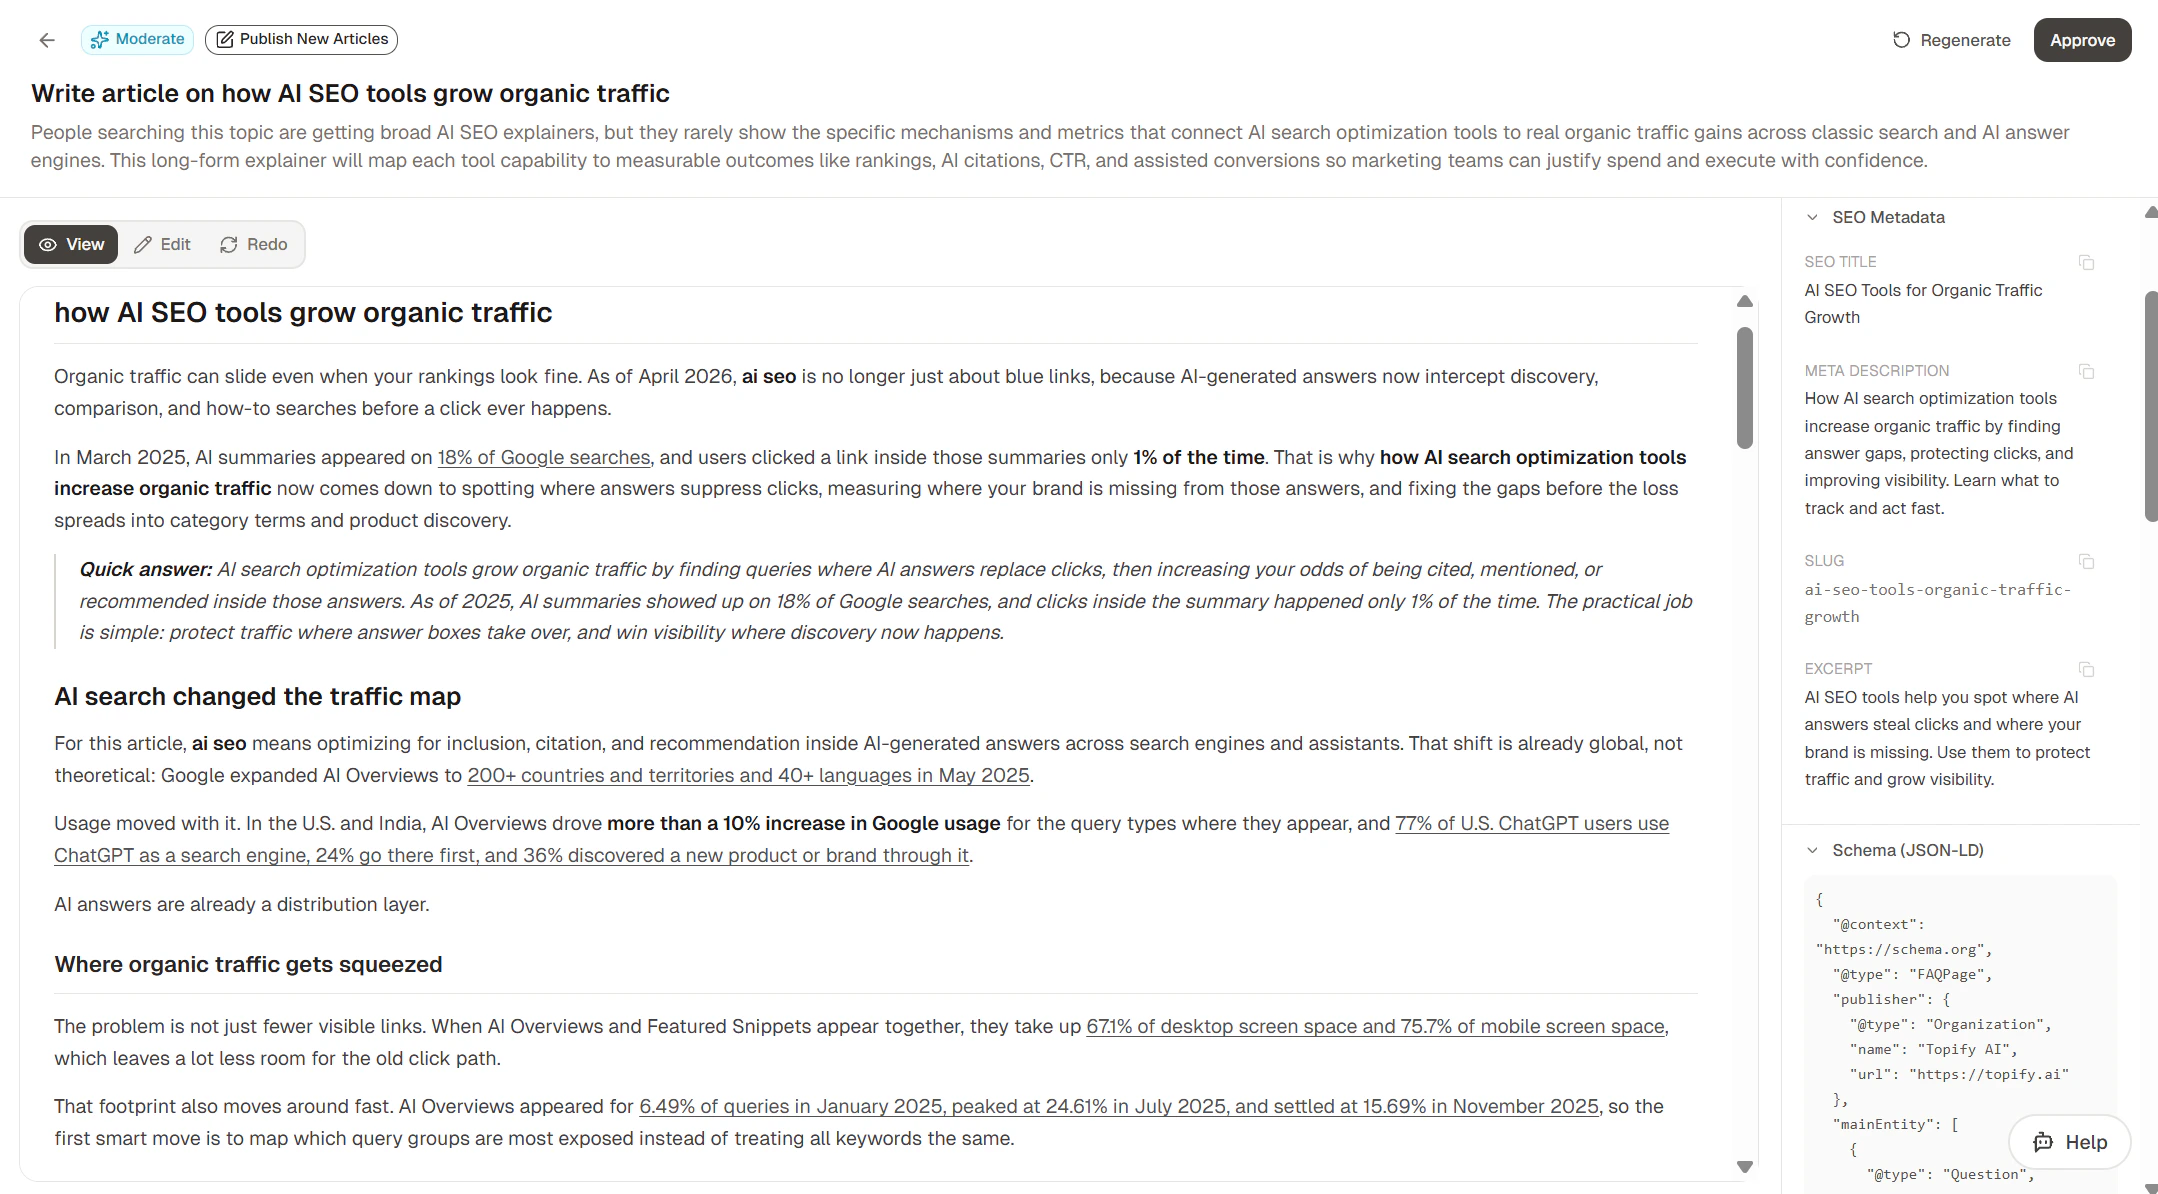
The article view shows the rendered content alongside a sidebar with SEO metadata and JSON-LD schema. Use the **View** toggle to switch between rendered and editor modes; **Regenerate** to redraft; **Approve** to commit.
Use **Regenerate** to redraft the outline, **Cancel** to go back, or **Approve & Write** to commit and start drafting.
The article view shows the rendered content alongside a sidebar with SEO metadata and JSON-LD schema. Use the **View** toggle to switch between rendered and editor modes; **Regenerate** to redraft; **Approve** to commit.
 Topify currently supports publishing to three CMS platforms: **Shopify**, **WordPress**, and **Framer**. If you have one connected, click **Publish** to push the article directly to your CMS.
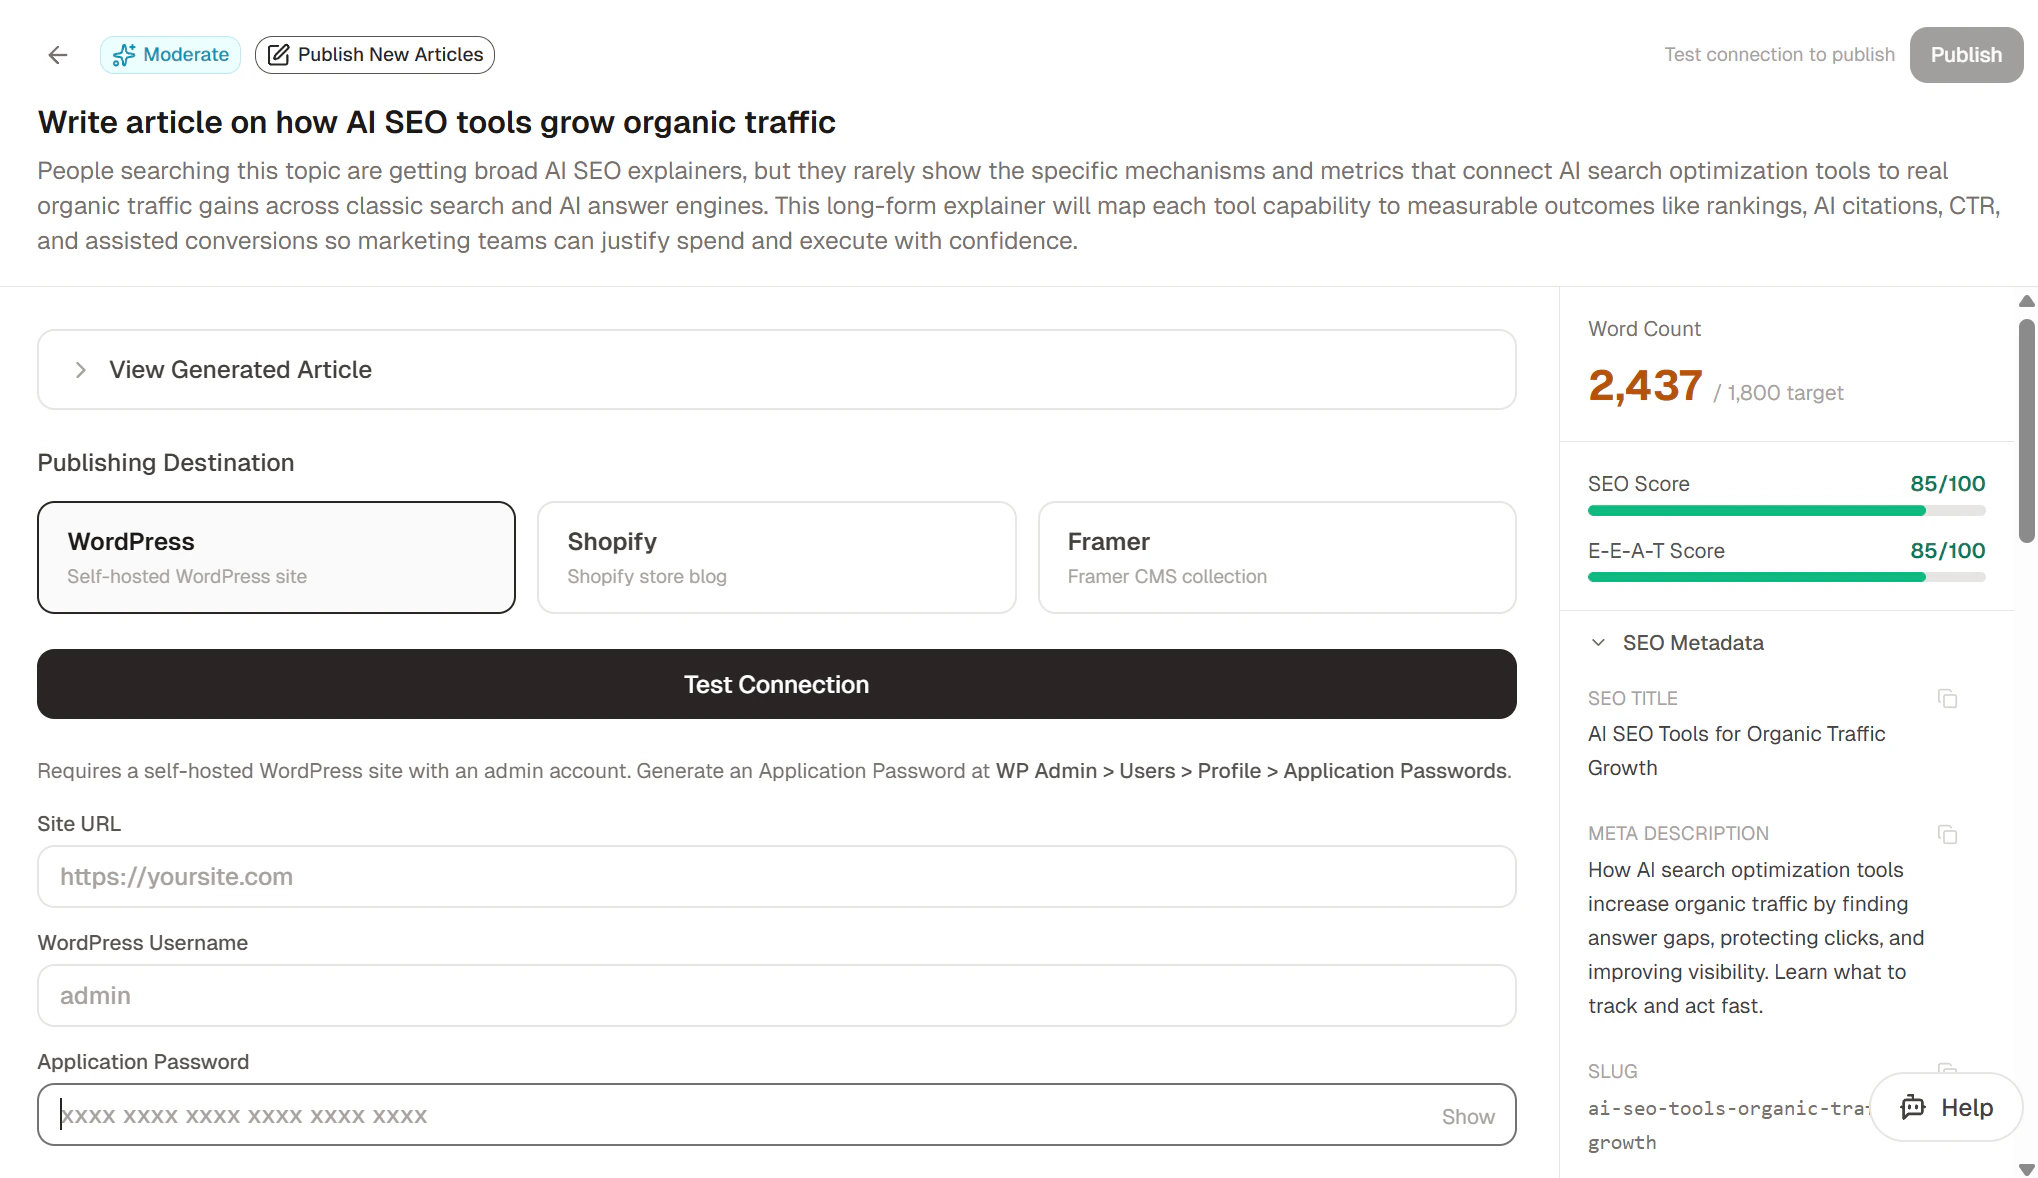 See [Integrations](/platform/integrations) to connect a publishing target.
## Create your own
If none of the recommended actions matches what you want to write, you can spin up your own from scratch. Click **+ Custom Action** at the top of the Actions page and pick **Write Article**. The Create Action dialog opens with the article configuration form.
See [Integrations](/platform/integrations) to connect a publishing target.
## Create your own
If none of the recommended actions matches what you want to write, you can spin up your own from scratch. Click **+ Custom Action** at the top of the Actions page and pick **Write Article**. The Create Action dialog opens with the article configuration form.
 From here, the rest of the flow is identical to the [Steps](#steps) above — submit, approve the outline, review, and publish.
## What's next
Let the agent pick topics, draft, and publish — all from chat.
Wire up WordPress, Shopify, or Framer for one-click publishing.
## FAQ
### Does a failed generation use a credit?
No. Credits are consumed only when an article completes successfully. If a step in the pipeline fails, you can retry the same task at no cost.
### How is this different from just asking ChatGPT to write an article?
ChatGPT writes from training data and whatever is in the chat. Topify's pipeline does live web research, fetches your reference URLs and uploaded files, applies GEO techniques (citations, statistics, authoritative tone) that make AI assistants more likely to *quote* the result, and outputs SEO metadata (slug, meta description, JSON-LD) ready for publishing. The goal isn't a one-off blog post — it's an article that earns AI citations.
### Can I edit the article after it's generated?
Yes. From the article view, switch to **editor mode** to edit the body content; the SEO metadata sidebar is also editable. Changes save automatically.
From here, the rest of the flow is identical to the [Steps](#steps) above — submit, approve the outline, review, and publish.
## What's next
Let the agent pick topics, draft, and publish — all from chat.
Wire up WordPress, Shopify, or Framer for one-click publishing.
## FAQ
### Does a failed generation use a credit?
No. Credits are consumed only when an article completes successfully. If a step in the pipeline fails, you can retry the same task at no cost.
### How is this different from just asking ChatGPT to write an article?
ChatGPT writes from training data and whatever is in the chat. Topify's pipeline does live web research, fetches your reference URLs and uploaded files, applies GEO techniques (citations, statistics, authoritative tone) that make AI assistants more likely to *quote* the result, and outputs SEO metadata (slug, meta description, JSON-LD) ready for publishing. The goal isn't a one-off blog post — it's an article that earns AI citations.
### Can I edit the article after it's generated?
Yes. From the article view, switch to **editor mode** to edit the body content; the SEO metadata sidebar is also editable. Changes save automatically.